
Affiliates Import is an extension for Affiliates, Affiliates Pro and Affiliates Enterprise. It allows to import affiliates in bulk from a text file. You can use this tool to migrate from another affiliate system or to import batches of affiliate accounts in general.
This tool works with plain text files to import affiliates. An easy to use and spreadsheet-ready file format is assumed, where user data is provided on a line with information like username and email separated by tabs.
During a bulk import, new users can be notified by email, providing them with their username, password and login link to the site.
Requirements
The plugin is an extension to and requires one of these plugins:
Affiliates, Affiliates Pro or Affiliates Enterprise
Download
You can download this free plugin here.
Installation
Upload the plugin zip file through Plugins > Add New > Upload Plugin on your WordPress dashboard.
Activate the Affiliates Import plugin.
Importing Affiliates
Once you have installed this plugin, a new menu item is available under Affiliates > Import.
In this section you can import affiliates in bulk through a text file. The text file must provide one line of data for each affiliate, with values separated by tabs.
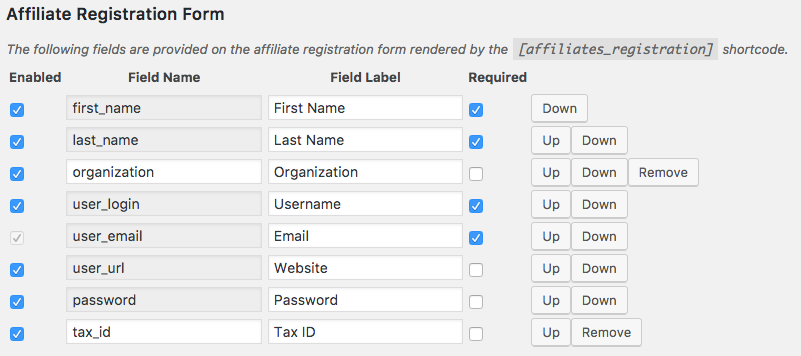
The information provided must include at least the user’s email address. Additional information can be provided and a customized subset of fields can be used. The tool supports all fields defined in the Affiliates, Affiliates Pro and Affiliates Enterprise systems, as set in Affiliates > Settings > Registration.
Please refer to the sections below on how to import affiliates, the file format and the Column Declaration.
How to import affiliates in bulk
Make a full backup of your site and database in case you need to revert the changes made to user accounts. It is highly recommended to test user imports on a staging or test site before importing users on a production site. You can also use small batches based on the same file used to import your affiliates.
Go to Affiliates > Import and configure the import settings according to your needs.
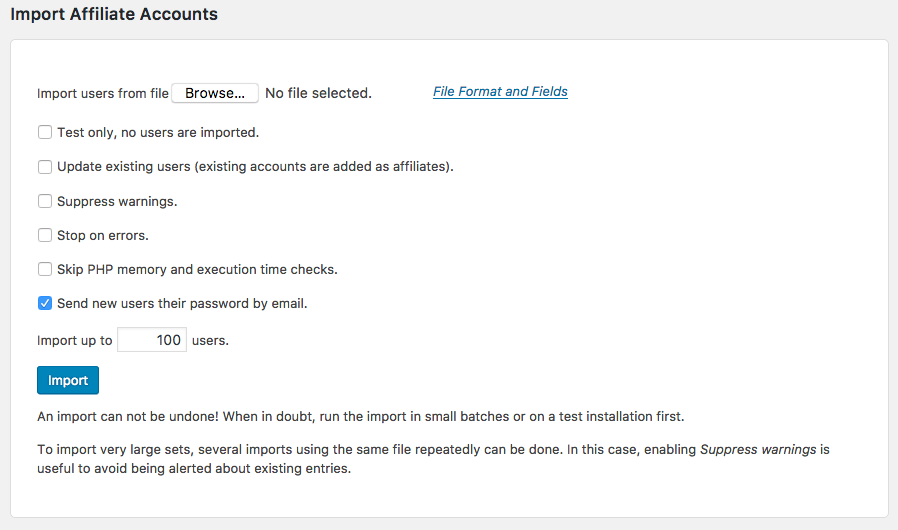
- Import users from file … : This is where you select the text file used to import the affiliates.
- Test only … : If this is checked, the tool will only check the entries and report back after analyzing the file to import. It will not create any affiliate accounts.
- Update existing users : If checked, existing users are signed up as affiliates and their data is updated if applicable.
- Suppress warnings : Avoids printing out some warning messages if checked.
- Stop on errors : Will halt the process if any error is encountered if checked.
- Skip PHP memory and execution time checks : Will skip internal test if checked. This should normally not be enabled to avoid inconsistencies during the import and prevent failures.
- Send new users their password : The system will send out an email to each new affiliate if this option is checked. Please make sure to check the hourly sending limits of your email server to avoid problems.
- Import up to X users : This allows to limit the number of affiliate accounts that are created. You can limit this conveniently to import affiliates in appropriately sized batches.
Once you have set the appropriate options, choose the file to import and click the Import button. Repeat if necessary to import all affiliate accounts.
File Format
The required file format is a text file with values separated by tabs. The minimum data that must be provided for each affiliate is the email address. The actual set of data that should be provided, is determined by the fields defined under Affiliates > Settings > Registration.
Here is an example configuration:
The file must provide one line of data for each affiliate to import, the values should be given according to the order of the fields under Affiliates > Settings > Registration.
You can download an example file in this format here: affiliates-import-example 2
The contents of this file as viewed on a spreadsheet are:

If you would like to provide the values in a different order, you can use a Column Declaration in the file used to import as described below.
Column Declaration
If you do not provide a Column Declaration, the entries in the imported file are expected to appear in the order as listed on Affiliates > Settings > Registration.
A different order can be determined explicitly by starting a line with the @ symbol, followed by one or more Field Names as configured under Affiliates > Settings > Registration.
Here we provide an example file with an explicit Column Declaration: affiliates-import-example 3
As you can see, this file starts with a Column Declaration on the first line:
@user_email organization first_name last_name user_login password tax_id user_url
The entries below provide affiliate data in that order. This is how the above example file looks opened in a spreadsheet:
