
The plugin adds the Mail menu to your WordPress dashboard. To review the settings or configure the plugin, go to Mail > Settings.
In this section, you can configure the Queue‘s paramters, SMTP settings, determine Senders priorities and actions, clean up test data and send out a test email.
Queue
The Mail Queue gathers emails that are sent on a deferred schedule. It allows to adjust the frequency and the number of emails that are sent out periodically.
The queue’s default settings might already be suitable for your setup. Anyhow, it is advisable to review and adjust them according to the limitations of the resources you have available.
The settings determine the average throughput of the email queue. In other words, it allows you to limit the number of emails sent per hour here.
- Hosted Email : Third-party email providers like Gmail, MailChimp / Mandrill, MailPoet, Mailgun, … usually enforce certain limits to the amount of emails that you can send through their facilities. You can adjust the values here to assure that when your site tries to send emails, they will not be rejected by your email provider because you exceed those limits.
- Self-hosted Email : If you are using your own email server, this is useful to adjust the emails sent in accordance with the resources that are allocated to your email server.
- Blogs with many Subscribers : A particularly useful case for the application of the Mail Queue is when blog post or comment notifications are sent out to hundreds or thousands of subscribers at a time. WordPress with many common popular plugins intends to notify all those subscribers at once, failing to manage these large amounts of emails being sent out appropriately. Essentially, each time you publish a new blog post that should reach a large audience or when a new comment is approved on a popular post, your site will try to send out emails to all those people and very likely fail, or leave you waiting in despair, as it exceeds sensible limits. The Mail Queue postpones all those emails and sends them out gradually, providing a reliable way to have all those subscribers notified in due time.
The parameters determine how many emails are sent and for how long the data is kept in the queue after they have been sent. The system sends out a batch of emails per cycle. You determine the time between each cycle in seconds and how many emails are sent per cycle.

- Seconds between cycles : This determines the number of seconds that will elapse between cycles. By default, the system will run a cycle every 5 minutes or 300 seconds.
- Emails per cycle : Here you can set how many emails maximum will be sent during each cycle. The higher the number, the more emails the system will try to send. When you save the settings, you will get an indication of up to how many emails per hour the system will try to send.
- Purge the queue : If this is enabled, the entries in the mail queue that have been processed (i.e. emails sent) are deleted from the queue.
- Seconds delay to purge : This determines the time it will take to purge entries that have been sent from the queue.
SMTP
When SMTP is enabled and configured, emails are sent out from your site using these settings.
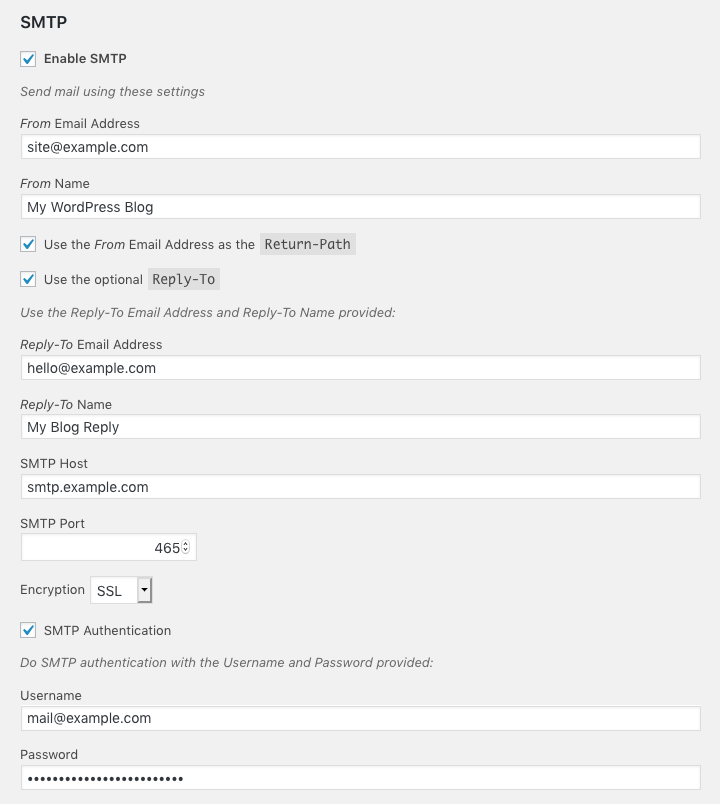
An example SMTP configuration provided via the Mail > Settings section.
The parameters that allow the system to send mail via SMTP through an existing email account, can be set using a) the fields provided for that purpose in the Settings, or b) via the ITTHINX_MAIL_QUEUE_SMTP constant which you add to your site’s wp-config.php.
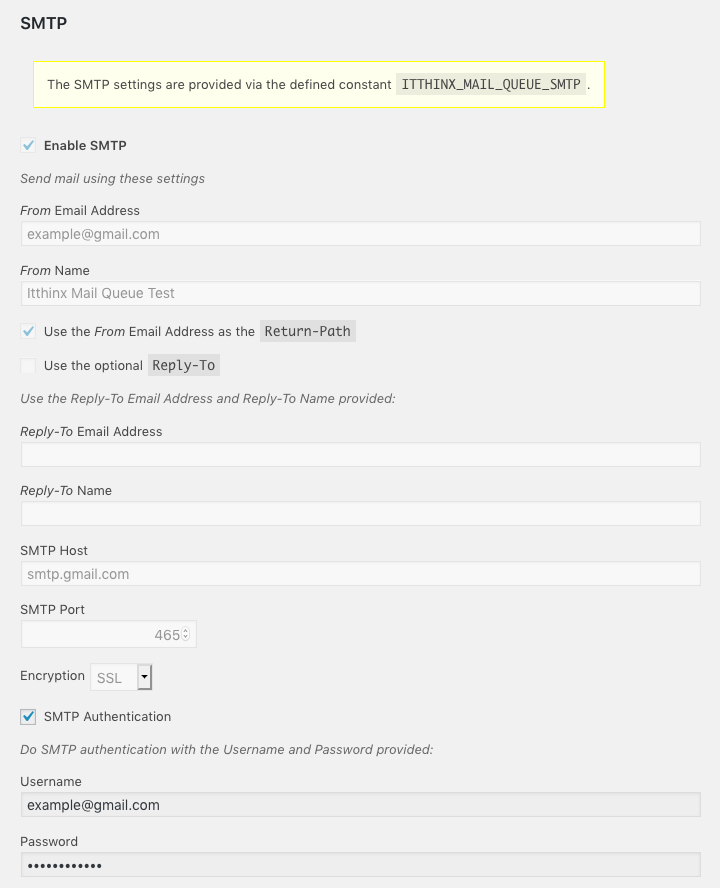
SMTP configuration using the ITTHINX_MAIL_QUEUE_SMTP constant.
The constant can be of advantage when you do not want to allow administrators to input or modify parameters like the email account’s password. If the constant explained below is defined, the corresponding fields in the Settings are disabled.
Using the SMTP Section in the Settings
- Enable SMTP : This must be checked so that emails are sent using the SMTP parameters set.
- From Email Address : Set the email address that is used to send out emails here.
- From Name : Choose a name for the sender.
- Use the From Email Address as the Return-Path : If checked, the From Email Address is used as the Return-Path.
Quoting from RFC 2821 : The primary purpose of the Return-path is to designate the address to which messages indicating non-delivery or other mail system failures are to be sent. - Use the optional Reply-To : Here you can tell the system to indicate an alternative email address to which replies should be sent. If checked, the fields Reply-To Email Address and Reply-To Name should be filled in.
Quoting from RFC 2822 : When the “Reply-To:” field is present, it indicates the mailbox(es) to which the author of the message suggests that replies be sent. In the absence of the “Reply-To:” field, replies SHOULD by default be sent to the mailbox(es) specified in the “From:” field unless otherwise specified by the person composing the reply. - Reply-To Email Address : Indicate the email address where you would like to receive replies to emails sent via SMTP from your site.
- Reply-To Name : Indicate the name to whom replies would be addressed to.
- SMTP Host : The hostname of the SMTP server.
- SMTP Port : The port at which the SMTP server is listening.
- Encryption : The type of encryption to be used to communicate with the SMTP server: None, SSL or TLS.
- SMTP Authentication : If checked, the SMTP server requires authentication to accept mail. A valid Username and Password must be provided.
- Username : The user account that authenticates with the SMTP server.
- Password : The password for the user account required to authenticate with the SMTP server.
Using hardwired SMTP Settings
To provide the SMTP parameters in your site’s wp-config.php, the following format is used:
define(
	'ITTHINX_MAIL_QUEUE_SMTP',
	array(
		'enabled'         => true,
		'email'           => 'mail@example.com',
		'name'            => 'My Site',
		'set_return_path' => true,
		'reply_to'        => false,
		'reply_to_email'  => '',
		'reply_to_name'   => '',
		'host'            => 'smtp.example.com',
		'port'            => '465',
		'encryption'      => 'ssl',
		'authentication'  => true,
		'username'        => 'mail@example.com',
		'password'        => 'itsasecret'
	)
);
The parameters thus provided are equivalent to the fields discussed above in the SMTP part of the Settings. Add the above with values adjusted in line with those of the email account that you intend to use.
Valid values for the encryption parameter are '' (for none), 'ssl' and 'tls'.
Senders
Here is where you configure how emails sent from your site are treated, based on which component or Sender is originating them.
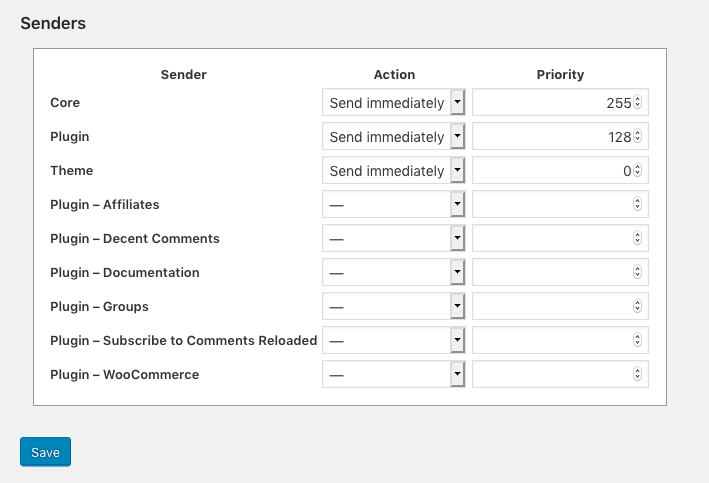
The default Senders configuration on a fresh installation. We recommend to adjust these settings to prioritize emails that are sent out via your site according to importance.
You will find entries for the following components:
- Core : Emails sent from the WordPress core.
- Plugin : Emails sent by plugins in general.
- Theme : Emails sent via the current theme.
- Plugin – … : Emails sent by a specific plugin, you will see one entry per active plugin here.
For each component, you can specify an Action and a Priority. The action determines how an email sent by the component is handled while the priority dictates which ones are handled first.
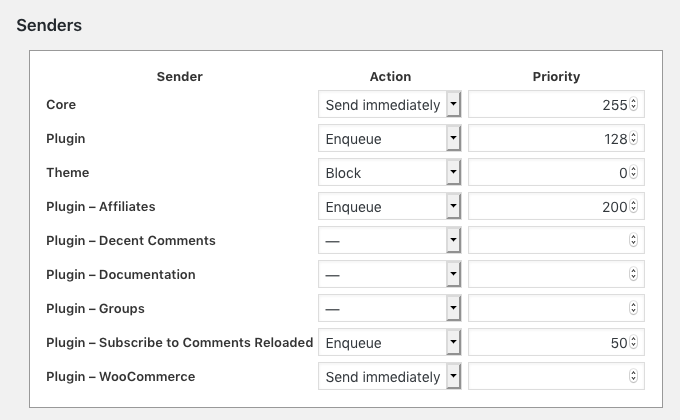
An example configuration that enqueues less urgent emails while sending out more urgent ones directly. Emails that might originate from the current theme are blocked in this example.
These are the available actions per component:
- – : Indicates no specific action for the component. Results in emails being enqueued unless superseded* by a generic or a more specific setting.
- Enqueue : Emails sent by the component are enqueued and sent later during the system’s processing cycles.
- Send immediately : The emails sent by the component are not enqueued but sent immediately.
- Block : If this action is chosen for a component, emails that originate from it are not sent and simply discarded.
* This makes sense for plugins, where the more general setting that applies to all plugins is used, unless a specific setting is indicated for a particular plugin.
When emails are enqueued, those with the highest Priority are processed first.
Delete Data
Here you can find an option that will wipe out all of the plugin’s data and any enqueued emails as soon as the plugin is deactivated. Use this option at your own risk and understand what exactly it implies:

- Delete data on deactivation
If this setting is enabled and the plugin is deactivated, it will delete all its data irrevocably. Use this only for testing purposes, all settings and enqueued emails that have not been sent will be lost.
Test Email
Here you can input an email address and have the system send a test email to it.
This is useful to see if emails are being sent correctly from the site, also to test whether your SMTP settings are working.
Hardwired Settings and Troubleshooting
The system allows to define several constant in your site’s wp-config.php.
ITTHINX_MAIL_QUEUE_SMTP: Can be used to provide the parameters for SMTP instead of indicating them in the plugin’s settings. Refer to the section Using hardwired SMTP Settings above for details.ITTHINX_MAIL_QUEUE_VOID: If this constant is defined as the boolean valuetrue, the mailer will discard all mail except mail that is already in the queue.ITTHINX_MAIL_QUEUE_PAUSE: If set totrue, the mail queue is paused and will not be sending any mail. This affects only enqueued mail and not such that is sent immediately.ITTHINX_MAIL_QUEUE_DELETE_DATA: If this constant is defined astrue, the plugin will delete all its data on deactivation. Note that this also takes effect when the equivalent option in the settings is disabled.ITTHINX_MAIL_QUEUE_SMTP_DEBUG_LEVEL: Determines the SMTP debug output level –0no output,1commands,2data and commands,3data, commands and connection status,4low-level data output.