Widgets Control Pro provides the following shortcodes:
[widgets_control]to render sections of content conditionally[widgets_control_content]to render content blocks in content[widgets_control_sidebar]to render custom sidebars in content
We will review these in detail below.
Restrict content sections with [widgets_control]
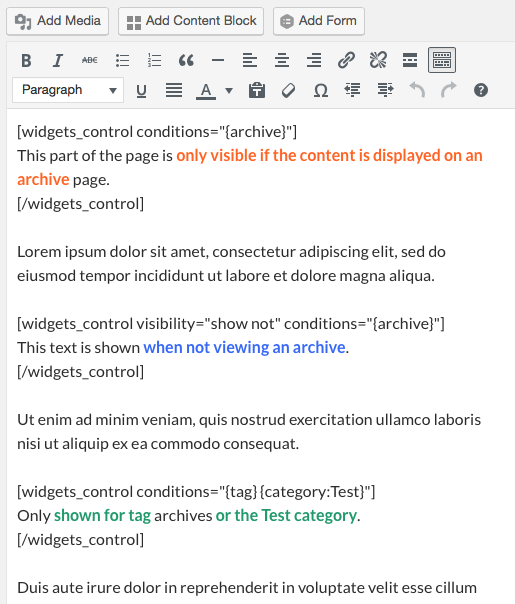
The plugin provides the [widgets_control] shortcode which is used to restrict content sections similar to how widgets are shown conditionally. This shortcode is always used to embed a section of content, i.e. you will place the opening and the closing tag around your content section.
Here’s an example:
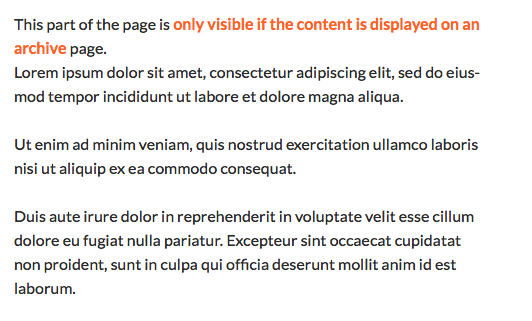
This is how the entry above would look like on an archive page:
The shortcode takes two attributes which determine whether the content that it surrounds will be shown or not. Here is an example:
[widgets_control visibility="show" conditions="{archive}"]
This text will only be visible when the content is rendered on archive pages.
[/widgets_control]
As you can see, the visibility attribute determines whether the conditions are used to show or hide the content section and the conditions attribute allows to indicate tokens similar to how we use them in widgets and sidebars. You can either use visibility="show" or visibility="show not", meaning that the conditions will apply to show the content in the first case or to hide the content in the latter. Actually you can omit visibility="show" completely because that’s the default. Here is another example:
[widgets_control conditions="{category:Fruit} {tag:banana}"]
This text will only be visible when the content is rendered on the "Fruit" category page or on the page for the tag "banana".
[/widgets_control]
Please note that the tokens that can be used in the conditions attribute will be written with curly brackets. For example, {archive} and not [archive] as used in the conditions for widgets and sidebars. This is due to limitations of the expression engine in WordPress that recognises shortcodes in your text.
The following tokens can be used in the conditions attribute to identify certain pages or sets of pages. You can indicate one or more tokens separated by spaces.
{id:(ID of a page)}– Identifies a page by its ID. For example,{id:123}.{title:(title of a page)}– Identifies a page by its title. For example,{title:Hello World}.{slug:(slug of a page)}– Identifies a page by its slug. For example,{slug:example-page}.{single}– For single posts.{page}– Identifies pages (the Page post type).{home}– The home page.{front}– The front page.{type:xyz}– For a specific post type.{archive}– Any archive page.{archive:xyz}– The xyz archive page.{category}– Category pages in general.{category:xyz}– A specific category.{has_term:term:taxonomy}– Whether the current post has the taxonomy term.{tag}– A tag archive page.{tag:xyz}– A specific tag archive page.{tax}– A taxonomy archive page.{tax:taxonomy}– A specific taxonomy archive page.{tax:taxonomy:term}– A specific taxonomy term page.{role:xyz} -A specific user role. For example,{role:editor}.{group:xyz} -A specific group. For example,{group:Registered}for any registered user or{group:Premium}for users in a Premium group.{author}– An author page.{author:xyz}– A specific author’s page.{language:xyz} -A specific language.{search}– The search results page.{404}– A 404 Not Found page!...– Prefix tokens, slugs or titles with!to exclude matching pages*.
*Tokens can be prefixed with an exclamation mark ! to exclude pages that match the condition. For example, one could show the content on any pages except a specific page.
Render Content Blocks with [widgets_control_content]
The [widgets_control_content] shortcode allows to render specific content blocks within the content of your posts, pages and other post types. This shortcode can be combined with the [widgets_control] shortcode to show these blocks conditionally.
The shortcode allows to provide the following attributes to fine-tune the display of the content block. To display a content block, you must at least provide the id, the slug or the content attribute.
content: This attribute requires the ID or the title of the content block. It is used to identify the content block that should be displayed. Alternatively, you can use theidor theslugattribute.id: Provide the ID of the content block to be displayed.slug: You can provide the slug of the content block to be displayed.show_title: Whether to display the title of the content block. Use"yes"to display the title above the content of the block or"no"to omit it.show_post_thumbnail: Whether to display the featured image of the content block. You can display the image if it is set by using"yes"and omit its display using"no".show_content: Whether to display the content of the content block, this defaults obviously to"yes"and can be disabled using"no".
Advanced attributes:
filter_the_content: This is used to determine whether the WordPressthe_contentfilter should be applied. The default is"yes"and can be disabled by using"no".filter_the_title: Whether thethe_titleWordPress filter should be applied – defaults to"yes"and can be disabled by providing"no".suppress_filters: Whether the WordPress filters should be suppressed while obtaining the content block (note this does not refer to thethe_titleor thethe_contentfilters but to those that are applied when obtaining posts). Defaults to"no"and can be enabled by using"yes".
When you edit a content block, you will see the basic version of the shortcode that you can use. You can simply copy and past it from there and if required, add additional attributes.
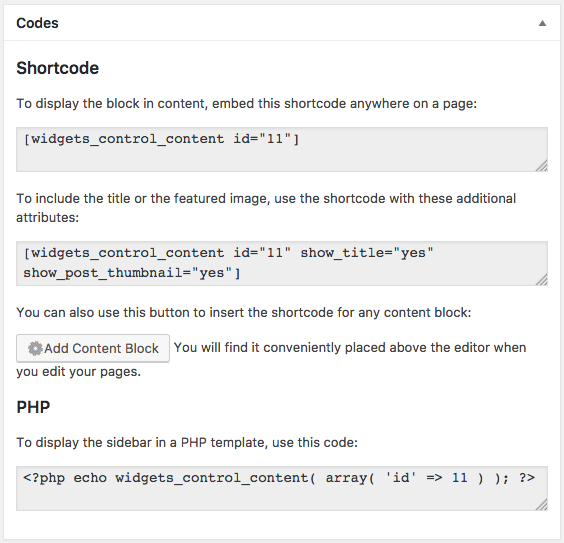
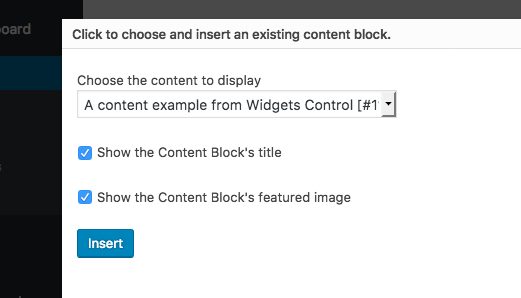
You can also use the Add Content Block button which is available on top of the WordPress editor on your posts, pages and other supporting post types.

When you click the button, you will see a form where you can adjust the settings based on what should be displayed and after clicking Insert it will create the correct shortcode for you and insert it in the page content.
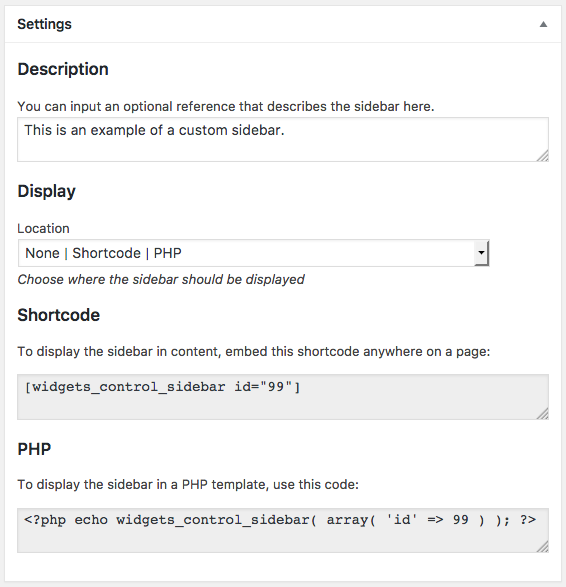
Render Sidebars with [widgets_control_sidebar]
You can use the shortcode [widgets_control_sidebar] to render one of the custom sidebars that you have created within the content of a post, a page or other custom post types.
You must provide the id of the sidebar to render it. Here is an example:
[widgets_control_sidebar id="123"]
The full shortcode including the sidebar id is shown when you edit the sidebar. You can simply copy and past it from there.